

Lift and Shift a Web App to Serverless. Is that even possible?


Table of contents
- Why do a lift and shift migration?
- Why migrate a web app to serverless?
- Requirements for migration
- Application overview
- Database migration
- Backend migration
- Web app migration
- Issues with this solution
- Authentication and authorization migration
- Storage migration
- Testing this application
- How much does this application cost?
- Performance analysis
- Conclusion
- Update - Using App Runner
Customers migrating to the cloud often want to get the benefits of serverless architecture. But what is the best approach and is it possible? There are many strategies to do a migration, but lift and shift is often the fastest way to get to production with the migrated workload.
You might also wonder if it’s possible to lift and shift an existing application that runs in a traditional environment to serverless. This blog post shows how to do this for a Mongo, Express, React, and Node.js (MERN) stack web app. However, the discussions presented in this post apply to other stacks too.
Why do a lift and shift migration?
Lift and shift, or sometimes referred to as rehosting the application, is moving the application with as few changes as possible. Lift and shift migrations often allow you to get the new workload in production as fast as possible. When migrating to serverless, lift and shift can bring a workload that is not yet in the cloud or in a serverless environment to use managed and serverless services quickly.
Migrating a non-serverless workload to serverless with lift and shift might not bring all the serverless benefits right away, but it enables the development team to refactor, using the strangler pattern, the parts of the application that might benefit from what serverless technologies offer.
Why migrate a web app to serverless?
Web apps hosted in a serverless environment benefit most from the capability of serverless applications to scale automatically and for paying for what you use.
Imagine that you have a personal web app with little traffic. If you are hosting in a serverless environment, you don’t pay a fixed price to have the servers up and running. Your web app has only a few requests and the rest of the time is idle.
This benefit applies to the opposite case. For an owner of a small ecommerce site running on a server, imagine if a social media influencer with millions of followers recommends one of their products. Suddenly, thousands of requests arrive and make the site unavailable. If the site is hosted on a serverless platform, the application will scale to the traffic that it receives.
Requirements for migration
Before starting a migration, it is important to define the nonfunctional requirements that you need the new application to have. These requirements help when you must make architectural decisions during the migration process.
These are the nonfunctional requirements of this migration:
Environment that scales to zero and scales up automatically.
Pay as little as possible for idle time.
Configure as little infrastructure as possible.
Automatic high availability of the application.
Minimal changes to the original code.
Application overview
This blog post guides you on how to migrate a MERN application. The original application is hosted in two different servers: One contains the Mongo database and another contains the Node/js/Express and ReactJS applications.
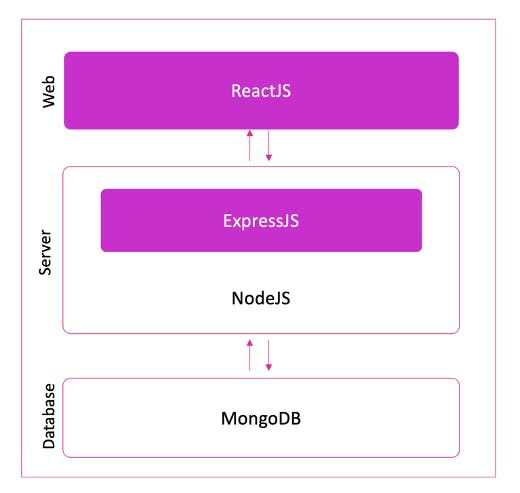
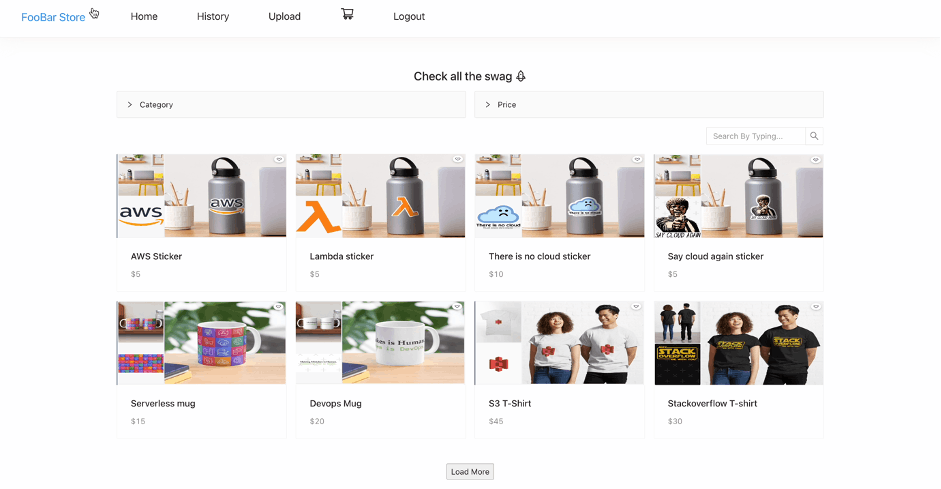
This demo application simulates a swag ecommerce site. The database layer stores the products, users, and the purchases history. The server layer takes care of the ecommerce business logic, hosting the product images, and user authentication and authorization. The web layer takes care of all the user interaction and communicates with the server layer using REST APIs.
These are the changes that you must make to migrate to a serverless environment:
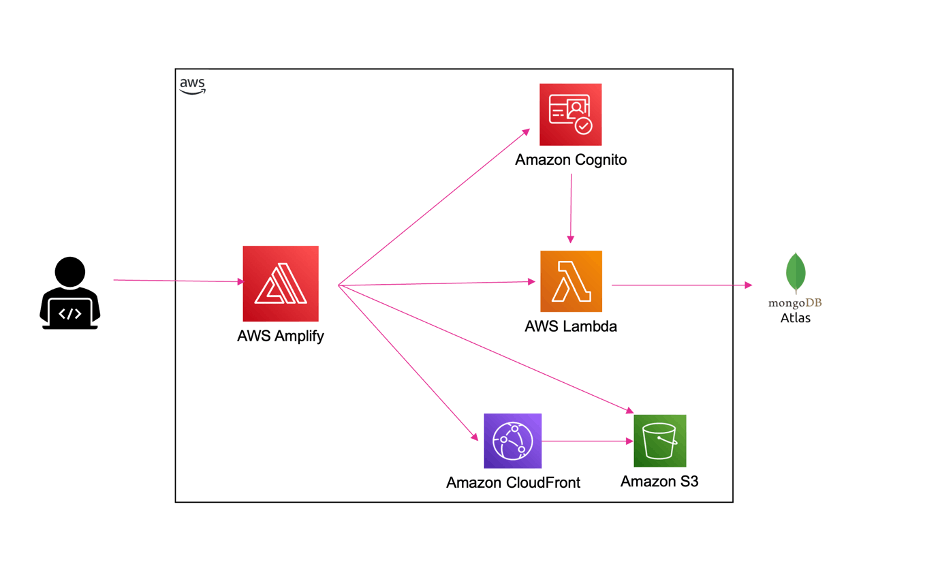
Database migration: Migrate the database from on-premises to MongoDB Atlas.
Backend migration: Migrate the NodeJS/Express application from on-premises to an AWS Lambda function.
Web app migration: Migrate the React web app from on-premises to AWS Amplify.
Authentication migration: Migrate the custom-built authentication to use Amazon Cognito.
Storage migration: Migrate the local storage of images to use Amazon S3 and Amazon CloudFront.
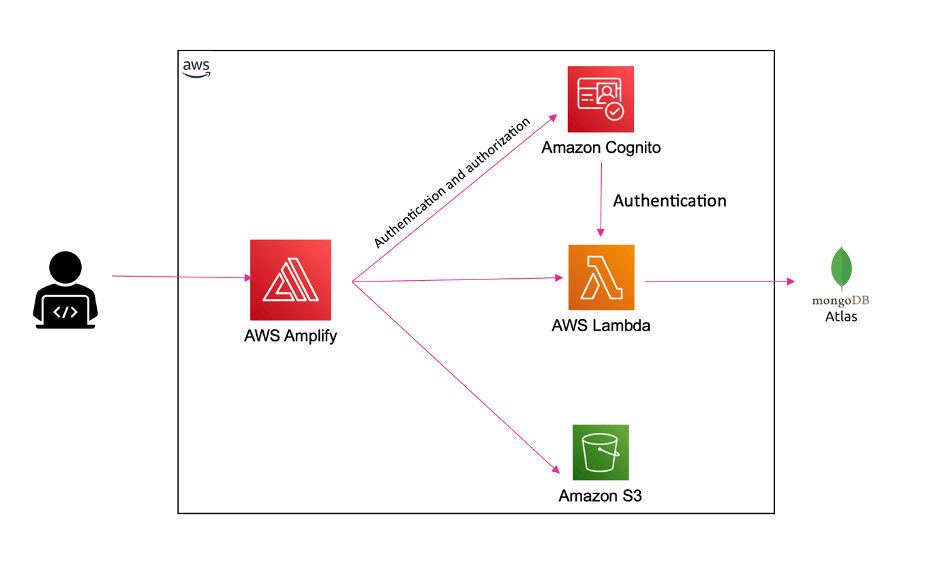
The following image shows the proposed solution for the migrated application:
Database migration
The database is already in a MongoDB vanilla container that has all the data for this application. As MongoDB is the database engine for our stack, their recommended solution to migrate to serverless is to use MongoDB Atlas. Atlas provides a database cluster in the cloud that scales automatically and you pay for what you use.
To get started, create a new Atlas cluster, then migrate the data from the existing database to the serverless one. To migrate the data, you can first dump all the content of the database to a dump folder and then restore it to the cloud:
mongodump --uri="mongodb://<localuser>:<localpassword>@localhost:27017"

mongorestore --uri="mongodb+srv://<user>:<password>@<clustername>.debkm.mongodb.net" .
After doing that, your data is now in the cloud. The next step is to change the configuration string in the server to point to the new database.
Backend migration
Migrating the Node.js/Express backend is the most challenging of the layers to migrate to a serverless environment, as the server layer is a Node.js application that runs in a server.
One option for this migration is to use AWS Fargate. Fargate is a serverless container service that allows you to scale automatically and you pay as you go. Another option is to use AWS AppRunner, a container service that auto scales and you also pay as you go. However, neither of these options align with our migration requirements, as they don’t scale to zero.
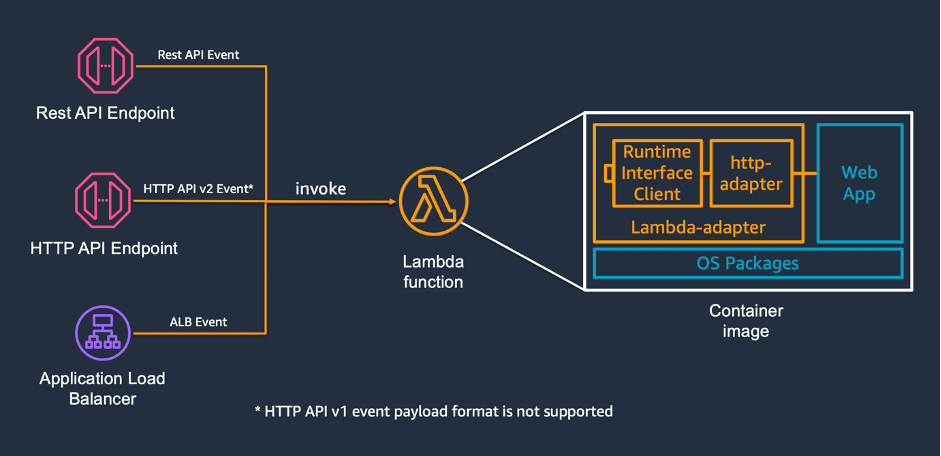
Another option for the lift and shift migration of this Node.js application is to use Lambda with the AWS Lambda Web Adapter. The AWS Lambda Web Adapter is an open-source project that allows you to build web applications with familiar frameworks, like Express.js, Flask, SpringBoot, and run it on Lambda. You can learn more about this project in its GitHub repository.
Using this project, you can create a new Lambda function that has the Express/NodeJS application as the function code. You can lift and shift all the code into the function. If you want a step-by-step tutorial on how to do this, check out this video.
const lambdaAdapterFunction = new Function(this,`${props.stage}-LambdaAdapterFunction`,
            {
                runtime: Runtime.NODEJS_16_X,
                code: Code.fromAsset('backend-app'),
                handler: 'run.sh',
                environment: {
                    AWS_LAMBDA_EXEC_WRAPPER: '/opt/bootstrap',
                    REGION: this.region,
                    ASYNC_INIT: 'true',
                },
                memorySize: 1024,
                layers: [layerLambdaAdapter],
                timeout: Duration.seconds(2),
                tracing: Tracing.ACTIVE,
            }
        );
The next step is to create an HTTP endpoint for the server application. There are three options for doing this: API Gateway, Application Load Balancer (ALB) , or to use Lambda Function URLs. All the options are compatible with Lambda Web Adapter and can solve the challenge for you.
For this demo, choose function URLs, as they are simple to configure and one function URL forwards all routes to the Express server. API Gateway and ALB require more configuration and have separate costs, while the cost of function URLs is included in the Lambda function.
Web app migration
The final layer to migrate is the React application. The best way to migrate the web layer and to adhere to the migration requirements is to use AWS Amplify to host it. AWS Amplify is a fully managed service that provides many features like hosting web applications and managing the CICD process for the web app. It provides client libraries to connect to different AWS resources, and many other features.
Migrating the React application is as simple as creating a new Amplify application in your AWS account and uploading the React application to a code repository like GitHub. This AWS Amplify application is connected to a GitHub branch, and when there is a new commit in this branch, AWS Amplify redeploys the code.
The Amplify application receives configuration parameters like the function URL endpoint (the server URL) using environmental variables.
const amplifyApp = new App(this, `${props.stage}-AmplifyReactShopApp`, {
            sourceCodeProvider: new GitHubSourceCodeProvider({
                owner: config.frontend.owner,
                repository: config.frontend.repository_name,
                oauthToken: SecretValue.secretsManager('github-token'),
            }),
            environmentVariables: {
                REGION: this.region,
                SERVER_URL: props.serverURL,
            },
        });
If you want to see a step-by-step guide on how to make your web layer serverless, you can check this video.
Issues with this solution
Now, if you try this migrated app, you will find two issues. The first one is that the user session is not sticky. Every time you log in, you are logged out unexpectedly from the application. The second one is that when you create a new product, you cannot upload new images of that product. Let’s analyze each of the problems in details and find solutions.
Authentication and authorization migration
The original application handled the authentication and authorization by itself. There is a user directory in the database, with the passwords and emails for each of the users. There are APIs and middleware that take care of validating that the user is logged in before showing the application. All the logic for this is developed inside the Node.js/Express application.
However, with the current migrated application every time you log in, you are logged out unexpectedly from the application. This is because the server code is responsible for handling the authentication and the authorization of the users, and now our server is running in an AWS Lambda function and functions are stateless. This means that there will be one function running per request—a request can load all the products in the landing page, get the details for a product, or log in to the site—and if you do something in one of these functions, the state is not shared across.
To solve this, you must remove the authentication and authorization mechanisms from the function and use a service that can preserve the state across multiple invocations of the functions.
There are many ways to solve this challenge. You can add a layer of authentication and session management with a database like Redis, or build a new microservice that is in charge of authentication and authorization that can handle the state, or use an existing managed service for this.
Because of the migration requirements, we want to keep the cost as low as possible, with the fewest changes to the application. The better solution is to use an existing managed service to handle authentication and authorization.
This demo uses Amazon Cognito, which provides user authentication and authorization to AWS resources in a managed, pay as you go way.
One rapid approach is to replace all the server code with calls to Amazon Cognito using the AWS SDK. But this adds complexity that can be replaced completely by just invoking Amazon Cognito APIs from the React application.
For example, when a new user is registered, the application creates the user in the Amazon Cognito user pool directory, as well as in the application database. But when a user logs in to the web app, the application calls Amazon Cognito API directly from the AWS Amplify application. This way minimizes the amount of code needed.
In the original application, all authenticated server APIs are secured with a middleware that validates that the user is authenticated by providing an access token. With the new setup that doesn’t change, but the token is generated by Amazon Cognito and then it can be validated in the backend.
let auth = (req, res, next) => {
    const token = req.headers.authorization;
    const jwtToken = token.replace('Bearer ', '');

    verifyToken(jwtToken)
        .then((valid) => {
            if (valid) {
                getCognitoUser(jwtToken).then((email) => {
                    User.findByEmail(email, (err, user) => {
                        if (err) throw err;
                        if (!user)
                            return res.json({
                                isAuth: false,
                                error: true,
                            });

                        req.user = user;
                        next();
                    });
                });
            } else {
                throw Error('Not valid Token');
            }
        })
        .catch((error) => {
            return res.json({
                isAuth: false,
                error: true,
            });
        });
};
You can see how this is implemented step by step in this video.
Storage migration
In the original application, when a new product is created, a new image is uploaded to the Node.js/Express server. However, now the application resides in a Lambda function. The code (and files) that are part of that function cannot change, unless the function is redeployed. Consequently, you must separate the user storage from the server code.
For doing this, there are a couple of solutions: using Amazon Elastic File System (EFS) or Amazon S3. EFS is a file storage, and you can use that to have a dynamic storage where you upload the new images. Using EFS won’t change much of the code, as the original implementation is using a directory inside the server as EFS provides. However, using EFS adds more complexity to the application, as functions that use EFS must be inside an Amazon Virtual Private Cloud (Amazon VPC).
Using S3 to upload your images to the application is simpler, as it only requires that an S3 bucket exists. For doing this, you must refactor the application, from uploading the image to the application API to use the AWS Amplify library that uploads and gets images from S3.
export function uploadImage(file) {
    const fileName = `uploads/${file.name}`;

    const request = Storage.put(fileName, file).then((result) => {
        return {
            image: fileName,
            success: true,
        };
    });

    return {
        type: IMAGE_UPLOAD,
        payload: request,
    };
}
An important benefit of using S3 is that you can also use Amazon CloudFront to accelerate the retrieval of the images from the cloud.
In this way, you can speed up the loading time of your page. You can see how this is implemented step by step in this video.
Testing this application
One benefit of this approach is that you can develop and test the backend and the front-end locally. The following video explains how you can do it.
How much does this application cost?
If you deploy this application in an empty AWS account, most of the usage of this application is covered by the AWS Free Tier. Serverless services, like Lambda and Amazon Cognito, have a forever free tier that gives you the benefits in pricing for the lifetime of hosting the application.
AWS Lambda—With 100 requests per hour, an average 10ms invocation and 1GB of memory configured, it costs 0 USD per month.
Amazon S3—Using S3 standard, hosting 1 GB per month and 10k PUT and GET requests per month costs 0.07 USD per month. This can be optimized using S3 Intelligent-Tiering.
Amazon Cognito—Provides 50,000 monthly active users for free.
AWS Amplify—If you build your client application once a week, serve 3 GB and store 1 GB per month, this costs 0.87 USD.
AWS Secrets Manager—There are two secrets stored using Secrets Manager and this costs 1.16 USD per month. This can be optimized by using AWS System Manager Parameter Store and AWS Key Management Service (AWS KMS).
MongoDB Atlas – Forever free shared cluster.
The total monthly cost of this application is approximately 2.11 USD.
Performance analysis
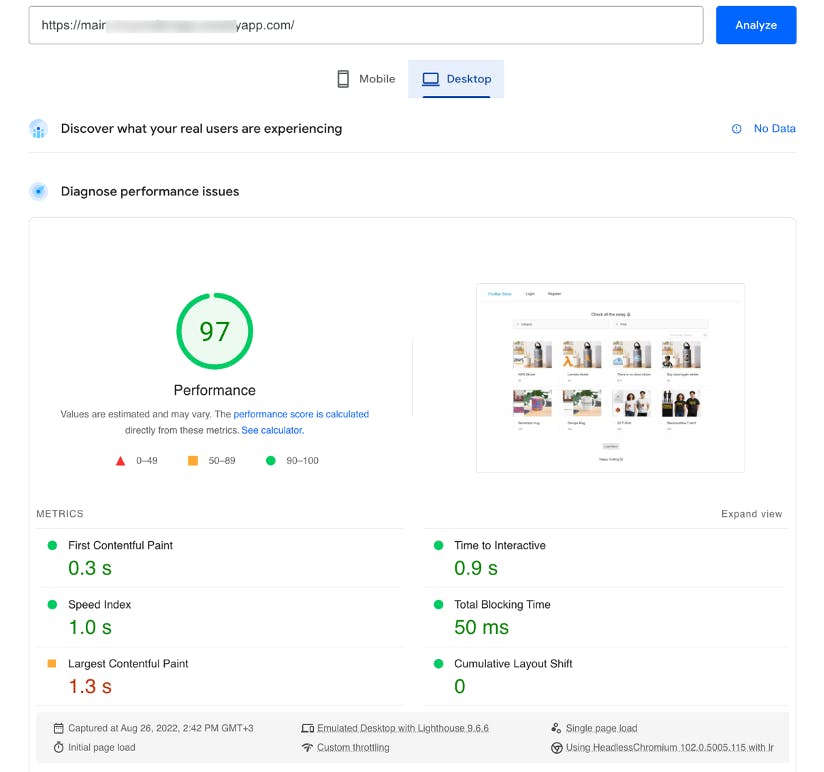
After you migrate the application, you can run a page speed insight tool, to measure this application’s performance. This tool provides results mostly about the front end and the experience that the user perceives. The results are displayed in the following image. The performance of this website is good, according to the insight tool performance score - it responds quickly and the user experience is good.
After the application is migrated to a serverless environment, you can do some refactoring to improve further the overall performance. One alternative is whenever a new image is uploaded, it gets resized and formatted into the correct next-gen format automatically using the event driven capabilities that S3 provides. Another alternative is to use Lambda on Edge to serve the right image size for the device, as it is possible to format the images on the fly when serving them from a distribution.
You can run load tests for understanding how your backend and database will perform. For this, you can use Artillery, an open-source library that allows you to run load tests. You can run tests with the expected maximum load your site will get and ensure that your site can handle it.
For example, you can configure a test that sends 30 requests per seconds to see how your application reacts:
config:
  target: 'https://xxx.lambda-url.eu-west-1.on.aws'
  phases:
    - duration: 240
      arrivalRate: 30
      name: Testing
scenarios:
  - name: 'Test main page'
    flow:
      - post:
          url: '/api/product/getProducts/'
Check this video to learn how to run these tests:
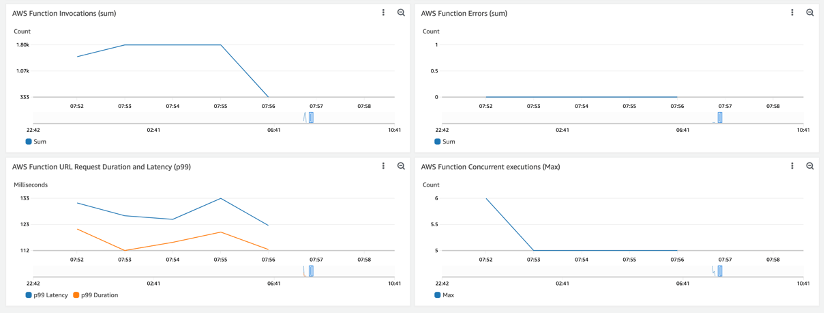
This test is performed on the backend APIs, not only testing your backend but also your integration with the MongoDB. After running it, you can see how the Lambda function performs on the Amazon CloudWatch dashboard.
The following video explains how to create this dashboards
Running this load test helps you understand the limitations of your system. For example, if you run a test with too many concurrent users, you might see that the number of throttles in your function increases. This means that you need to lift the limit of invocations of the functions you can have at the same time.
Or when increasing the requests per second, you may find that the MongoDB cluster starts throttling your requests. This is because you are using the free tier and that has a set number of connections. You might need a larger cluster or to migrate your database to another service that provides a large free tier, like Amazon DynamoDB.
Conclusion
In this article, you learn if it is possible to migrate a non-serverless web application to a serverless environment without changing much code. You learn different tools that can help you in this process, like AWS Lambda Web Adaptor and AWS Amplify, and how to solve some of the typical challenges that we have, like storage and authentication.
After the application is hosted in a fully serverless environment, it can scale up and down to meet your needs. This web application is also performant once the backend is hosted in a Lambda function. If you need, from here you can start using the strangler pattern to refactor the application to take advantage of the benefits of event-driven architecture.
To see all the steps of the migration, there is a playlist that contains all the tutorials for you to follow.
Update - Using App Runner
The migration of the server can also be done using AWS App Runner. In this video you can find an introduction to the service.
In this video you can find the steps you need to do in order to migrate the service from on prem to App Runner.